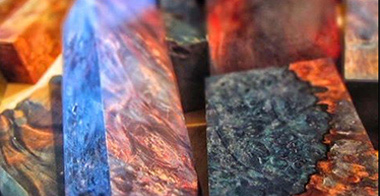
What is stabilized wood and how to make this wood
Wood and softwood wood chips can be changed during the process of stabilization, making them wood of beauty and durability, and even create a work of art.What is wood resistant and how is it made? The term stabilizing wood or stabilizing operations is referred to as the set of steps in which waste wood chips or uncoated softwood can be converted into more durable and more beautiful wood. All those who work with wood after the completion of a project encounter a large amount of waste and seemingly unused. Or wood that can not be used because of its softness.Most people know and wipe this wood without use. But we want to tell you how to turn these wood into usable and custom-made wood. What are the principles of this work? The main principle of this work is to remove a soft and extra piece of wood and to impregnate it into a resin to make a hard and hard wood that is resistant to damage
Stick to your favorite color:
One of the interesting parts of this work is to paint pieces of wood in accordance with your favorite color. This is easy and the range of colors you can choose is infinite. Paint and resin should be mixed together. But the color you choose is the specific color for the stabilizing operation and its use is ¼ tablespoons over a quarter of the resin can. If you want to have a bright and bright color, the amount of color you are mixing is more.
Get ready for the main stabilizing operation:

Now that the parts of the wood are dry and stained, it is time to perform the main stabilization operation.
You can also use the Vacuum Stabilization Chamber Kit, and you can use your own tool to use it. First, place the iron compartment in the steel bucket, place the wooden parts in the compartment, and use a floating balance device to prevent the floating of the wood during operation. Fill the container in the bucket with resin material; the amount of resin should be as large as the wood to immerse and about 3 centimeters of resin on top of the wood parts. Do not worry about resin because it can be used repeatedly. Close the chamber door and turn on the air conditioning unit and increase its power to the last degree slowly. This action prevents the resin from burning very quickly. Depending on the thickness and type of wood, the device should be bright from 30 minutes to one hour.

First, the resin should be washed out to prevent the bubbles in the wood, and the process should continue to the point where the bubbles remain in the wood a little bit. Shaking a chamber in which the wood is inside is also helping to eliminate bubbles. When the bubbles are destroyed, turn off the machine and remove the door and slowly pull the wood out. After removing the wood, you will notice that the wood does not absorb much resin, which is because the wood can not absorb too much resin under the vacuum cleaner, put it in the resin Then take the equilibrium device and if it floats, repeat it again. When finished, remove the wood from the chamber and remove excess resin on them. Dispose of resin material for reuse in a container. Wash the container with water and soap before resin gripping.
Bake wood!
Now that the wood is completely resinous, put the wood parts in the foil and place them in the microwave, which is already heated with 200 degrees Fahrenheit. We recommend using a cheap microwave, not your home microwave. In this way, family members will be more satisfied! Use a fair-tiered fryer because the heat, too much or too little, will damage the process. The duration of exposure to the oven should be 30 minutes. Of course, large parts need more time. Check it out after 30 minutes. The wood is cooked hard and crystalline. Keep them in the oven until the resins have dried completely. After 28 or 48 hours, they can be cut and used
 .
.
Caspiandoor, using the knowledge and experience in the wood industry and having advanced tools and machinery, the ability to design and implement all types of cabinets, wood cabinets, helicopter cabinets (modern cabinets), membrane cabinets, construction and installation of various types of doors All wood, MDF door without PVC overlays in the implementation of designs on the door with a CNC machine, HDF door with uncoated PVC in the implementation of designs on the door with a CNC machine, a door with a melamine coating, the construction and installation of a wardrobe and wall cabinet And a variety of complex wooden structures throughout Gilan and Rasht for your loved ones


 فارسی
فارسی Русский
 العربية


